Guide 01
Sign in with Google or your email
Start in under a minute. No password to remember.
- 1
Open BalanceUp
Install the app from Google Play and open it.
- 2
Pick how to sign in
Tap Continue with Google and choose your account — or type your email and tap Continue.
- 3
Using email? Enter the code
We email you a 6-digit code. Type it in. Codes work once and expire quickly.
- 4
First time only: finish your profile
Add your name and mobile number, then create a 6-digit login PIN.
- 5
You’re in
Next time, sign in the same way — Google, an email code, or your email/mobile with your PIN.
Tip: Forgot your PIN? Tap Log in with PIN → Forgot PIN, and reset it with a code sent to your email.
Guide 02
Read your Home screen
Quick actions, your accounts and active groups — at a glance.
- 1
Quick actions
Add an expense, open Groups or Accounts, or jump to Settle up from the top row.
- 2
Your accounts & active groups
The two newest of each, with what’s paid, due or owed. Tap one to open it.
- 3
More from iEncode Tech
At the bottom: one of our other apps, Allyo or SewaMart. Tap Get it on Google Play to see it.
Tip: Pull down on Home to sync right away. Everything else loads from your phone, so Home opens instantly — even offline.



Guide 03
Keep an account for a shop or a person
A private ledger for your grocer, milkman, tailor or a friend.
- 1
Create the account
Go to Accounts → Create account. Give it a name. A cover and currency are optional.
- 2
Add an expense
Open the account → Add expense. Enter the total amount, a category and the date.
- 3
Paid it all? Choose Full
Full means you paid everything now — nothing is due.
- 4
Paid some? Choose Advance
Enter what you paid now. The rest becomes Due automatically.
- 5
Check Transactions
Every entry is listed by day, newest first, with what’s paid and what’s due.
Tip: Done with a shop? Close the account from its menu — it becomes read-only but stays in your history.

Sharma Kirana Store
₹4,200 still due
Guide 04
Pay a Due — all at once or in parts
Clear what you owe the way you actually paid it.
- 1
Open the Due tab
Inside the account, the Due tab lists every entry that isn’t fully paid.
- 2
Tap the entry
A sheet opens showing how much is still to pay.
- 3
Full pay
Clears the whole remaining Due in one go, dated today.
- 4
Part pay
Type the amount you paid and pick the date. The Due goes down by that much.
- 5
See the history
Every payment shows under the entry, oldest first.
Tip: BalanceUp only records payments — the money itself changes hands outside the app.
Guide 05
Create a group for a trip, flat or event
One shared place for everyone’s expenses.
- 1
Start a group
Go to Groups → Create group.
- 2
Add the details
Name, date and a budget. Pick a cover photo if you like.
- 3
You’re the admin
You can invite people, add expenses and change the group’s settings.
- 4
Choose who can do what
In Settings, decide who may add expenses, invite people, close or delete the group.
Tip: Set a budget to see spent, remaining and overspent update with every expense.

Goa Beach Trip
4 members · ₹28,400 spent
Guide 06
Invite people — by name or with a link
Bring friends in, even if they don’t have the app yet.
- 1
Open the Members tab
Inside the group, tap Members.
- 2
Invite someone you know
Tap Add member and search by email, mobile number or name. They accept from their Requests tab.
- 3
Or share a join link
Tap Invite with a link (or the share button at the top) → Share link. Send it on WhatsApp, SMS or any app.
- 4
Add a guest
No phone or no app? Add them as a guest by name — they can still pay and share expenses.
- 5
Stop a link
Tap Reset link. Old links stop working straight away.
Tip: Only people allowed to invite (admins, or everyone if the group allows it) see the link.
Guide 07
Join a group from a link
Got a BalanceUp link from a friend? One tap and you’re in.
- 1
Tap the link
On Android with BalanceUp installed, the app opens straight to Join group.
- 2
No app yet?
The link opens a preview of the group with a Get it on Google Play button. Install, then tap the link again.
- 3
Sign in if asked
New here? Sign in first — you’ll land back on the invite afterwards.
- 4
Tap Join group
You’re now a member. The group, its members and expenses download to your phone.
Tip: On iPhone the link shows the group in your browser for now — the iPhone app is coming soon.
Guide 08
Add a group expense and split it
Who paid, who shares it, and how — in a few taps.
- 1
Tap Add expense
Inside the group (or the + button on Home).
- 2
Enter the basics
Amount, category, date and a short note like “Dinner”.
- 3
Choose who paid
Any member or guest.
- 4
Choose who shares it
Tick everyone who should pay a part.
- 5
Pick Equal or Exact
Equal divides it evenly to the paisa. Exact lets you type each share — they must add up to the amount.
- 6
Save
The expense shows under today’s date. Tap it any time to see each person’s share.
Tip: The person who added an expense, or an admin, can edit or delete it while the group is active.
Guide 09
Settle up and close the group
See who owes whom, pay each other, then close the group.
- 1
Open Settle up
From the group, tap Settle up to see the summary.
- 2
Check the balances
Each person’s paid amount, share and balance — green gets money back, red owes.
- 3
Follow the suggested payments
BalanceUp shows the fewest payments that settle everyone.
- 4
Pay each other outside the app
Cash, UPI or bank transfer — however you like.
- 5
Close the group
Settings → Close group. It becomes read-only, so the numbers never change again.
Tip: BalanceUp never moves money. It only does the maths.
Guide 10
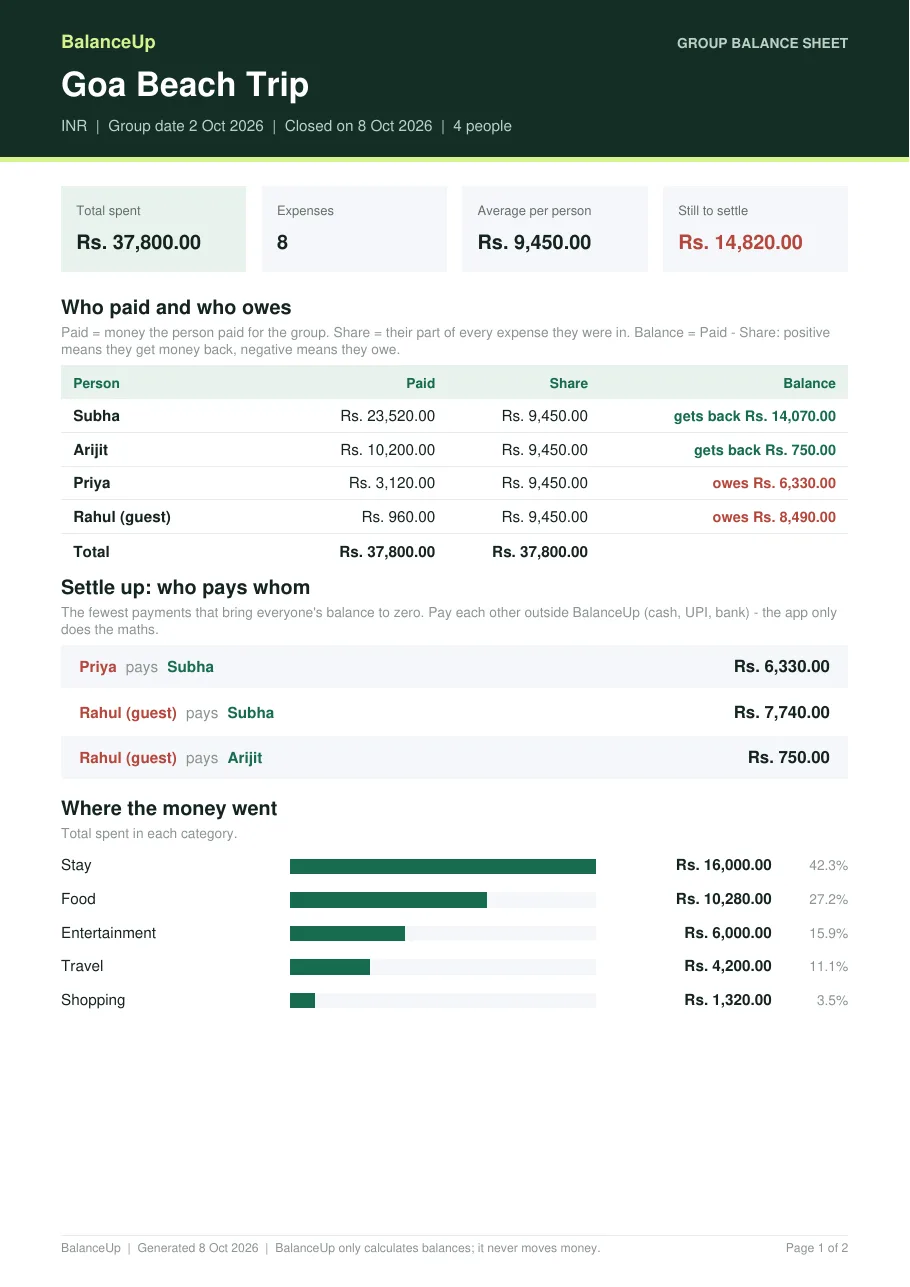
Share the group’s balance sheet (PDF)
A clear PDF of everything — perfect for the group chat.
- 1
Open the closed group
The Expenses tab shows a Balance sheet (PDF) card.
- 2
Tap Share
The PDF is made right then and your phone’s share sheet opens. Send it on WhatsApp, email or Drive.
- 3
Or tap Open PDF
View it on your phone first.
- 4
What’s inside
Total spent, each person’s paid / share / balance, who pays whom, spending by category, and every expense with its split.
Tip: The PDF isn’t stored on our servers — it’s made fresh each time you tap.
Share PDF
Guide 11
Use BalanceUp without internet
Keep going on a flight, in the hills or in a basement.
- 1
Just keep using it
Open accounts and groups, add, edit or delete expenses, record payments and settle up.
- 2
Saved on your phone
Changes are kept safely on your phone while you’re offline.
- 3
Syncs by itself
When you’re back online, changes upload in the background and others’ changes come down.
- 4
A few things need internet
Signing in, inviting people, join links, closing or deleting a group, and the balance sheet PDF.
Tip: If a change can no longer be saved — say the group was closed meanwhile — BalanceUp tells you why.